Unityでの直線の引き方
-LineRendererの使い方-
LineRendererによる直線の描画方法
Unityで線を引く為にはlinerendlerを用いる。直線の始点と終点の座標をVector3型の変数で指定し、linerendlerに与えることで行う。
必要なパラメータは引きたい線の始点から終点までの座標で、Vector3型で表す。これらの座標をlineレンダラーに渡すことで指定した座標全てを直線で結んだ線が引かれる。(下図)
そこで本記事では、基本的な直線の引き方に加え、途中で折れ曲がった直線、太さが変わる直線の引き方について説明する。
目次
- 直線の引き方
- 途中で折れ曲がった線の引き方
- 線の色&太さの指定
- ゲームへの応用
- ダウンロード
直線の引き方
直線を引くには、始点と終点の座標を指定すれば良い。座標の指定はVector3型の変数を用いデフォルトの状態ではワールド座標で指定する
*1 。
指定した座標はラインレンダラーのSetPositionを用いインデックスとして指定することで、座標の指定が完了し、直線が引かれる。
下図の場合始点の座標は-3 0 0 終点は3 0 0である。(下図)
*1 ローカル座標で指定することも可能。(スクリプト参照)

public class LineTest : MonoBehaviour
{
LineRenderer lineRenderer;
// Start is called before the first frame update
void Start()
{
lineRenderer=gameObject.AddComponent<LineRenderer>();
Vector3 pos1 = new Vector3(-3, 0, 0);
Vector3 pos2=new Vector3(3, 0, 0);
lineRenderer.useWorldSpace = true;//ワールド座標で点の位置を指定する。(デフォルトではワールド座標、これ以降のサンプルでは省略)
lineRenderer.SetPosition(0, pos1);//インデックスとして登録
lineRenderer.SetPosition(1, pos2);
}
}
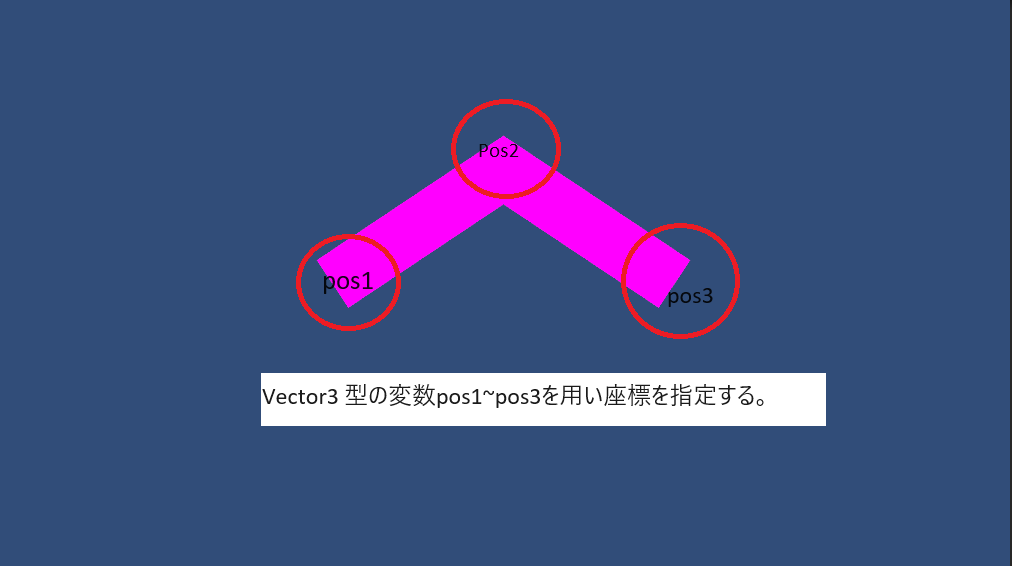
途中で折れ曲がった線の引き方
途中で折れ曲がった線を引くには、引きたい線の始点から終点の間にある、折れ曲がりがある点の座標を指定する。
直線と同じようにSetPositionを用い座標をインデックスとして指定する。
そうすると指定した各点を、インデックスした順に直線で繋いだ線が書ける。
また指定した点の数を指定する必要がある。
下図の場合 始点と終点に加え、中間点の座標を指定してある。この場合点の数は3箇所である。勿論中間点を増やすことも可能。
また下のスクリプトでは中間点の座標が時間と共に移動するようになっている。
public class LineTest : MonoBehaviour
{
LineRenderer lineRenderer;
int loopCnt;
// Start is called before the first frame update
void Start()
{
lineRenderer=gameObject.AddComponent<LineRenderer>();
Vector3 pos1 = new Vector3(-3, 0, 0);
Vector3 pos3=new Vector3(3, 0, 0);
lineRenderer.positionCount = 3;//3点以上指定する時は点の数を指定する必要がある
lineRenderer.SetPosition(0, pos1);//始点
lineRenderer.SetPosition(2, pos3);//終点
}
// Update is called once per frame
void Update()
{//中間点を移動させる
float rad = loopCnt * (Mathf.PI / 180);
Vector3 pos= new Vector3(Mathf.Cos(rad), Mathf.Sin(rad), 0)*3;
lineRenderer.SetPosition(1, pos);//中間点
loopCnt++;
}
}
線の色&太さの指定
線の幅を変更するには、startWidth,endWidthを用い、始点と終点の太さをそれぞれ指定する。
色の変更も同様で,startColor,endColorを用いる。この時マテリアルを設定する必要がある。

public class LineTest : MonoBehaviour
{
LineRenderer lineRenderer;
// Start is called before the first frame update
void Start()
{
lineRenderer=gameObject.AddComponent<LineRenderer>();
Vector3 pos1 = new Vector3(-3, 0, 0);
Vector3 pos2=new Vector3(0, 2, 0);
lineRenderer.SetPosition(0, pos1);
lineRenderer.SetPosition(1, pos2);
lineRenderer.material = new Material(Shader.Find("Sprites/Default"));//色の指定の際はマテリアルが必要
lineRenderer.startColor = Color.red;
lineRenderer.endColor = Color.blue;
lineRenderer.startWidth = 0.5f;//幅の指定
lineRenderer.endWidth = 2;
}
}
ゲームへの応用例-HPゲージの表示-
ゲームへの応用として、シューティングゲームの敵キャラのHPゲージを作成した。今回作成するHPゲージの仕様は以下の通り(動画参照)。
- 敵のHP残量に応じ短くなっていく
- 全ての敵に対し表示されるのではなく、一部の敵のみ
- 表示位置は画面上部
HPゲージ表示用オブジェクトの作成
空のオブジェクト(HpBar)を作成し、座標を(0,0,0)にしておく、その後カメラの子オブジェクトにする。こうする事でカメラが移動しても常に画面上一定の位置にHPゲージが表示される。
また、HpBarスクリプトを作成しアタッチしておく。
HpBarスクリプト作成
次にスクリプトを作成する。HPゲージの始点(右端)の位置を、
HpBarの位置とそこからの相対位置で指定した。今回の場合
pos[0] = new Vector3(transform.position.x,transform.position.y, transform.position.z)+new Vector3(2.5f,5,0);
となる。
終点(HpBarの左端)は、Hpゲージの長さ(lenght)を使って以下のようにした。
pos[1] = new Vector3(-lenght, 0, 0) + pos[0];
次にHpゲージの長さを求める関数を作成した。
必要な引数は、敵の最大Hp と現在のHpである。
この関数をHpゲージを表示させたい敵から呼び出すことで敵の残りHpに応じたゲージの長さを求める。
また、ゲージの表示・非表示を切り替えるプロパティも作成した。
public class HpBar : MonoBehaviour
{ LineRenderer LineRenderer;
Vector3[] pos=new Vector3[2];
const float MaxLenght = 5;//Hpバーの最大の長さ
float lenght;
bool isDisplayed=false;
// Start is called before the first frame update
void Start()
{
lenght=MaxLenght;
LineRenderer = GetComponent<LineRenderer>();
}
// Update is called once per frame
void Update()
{
if (isDisplayed==false)
{
lenght = 0;
}
pos[0] = new Vector3(transform.position.x,transform.position.y, transform.position.z)+new Vector3(2.5f,5,0);
pos[1] = new Vector3(-lenght, 0, 0) + pos[0];
//Debug.Log(pos[0]);
LineRenderer.SetPosition(0, pos[0]);
LineRenderer.SetPosition(1, pos[1]);
}
public void DisplayHpBar(int hp,int maxHp)
{
Debug.Log((float)hp / maxHp);
lenght = MaxLenght*((float)hp/maxHp);
}
public bool IsDisplayed
{//表示・非表示切り替え
set { isDisplayed = value; }
}
}
敵の作成
敵キャラはHpBarスクリプト内のDisplayHpBarを呼び出す事で、Hpゲージの長さを指定している。またこの時、Hpゲージの表示をOnにしている。
Startメソッドで、HpBarスクリプトを取得し、これをUpdateで呼び出す仕様になっている。また敵のHpがゼロになった時、Hpゲージの表示をoffにしている。
const int Hp = 1500;
int hp;
GameObject cam;
GameObject Mysip;
HpBar HpBar;
// Start is called before the first frame update
void Start()
{
hp= Hp;
Mysip = GameObject.FindGameObjectWithTag("MyShip");
cam = GameObject.FindGameObjectWithTag("MainCamera");
HpBar = GameObject.FindGameObjectWithTag("HpBar").GetComponent<HpBar>();
transform.SetParent(cam.transform);
HpBar.IsDisplayed = true;//表示をONにする
}
// Update is called once per frame
void Update()
{
HpBar.DisplayHpBar(hp, Hp);
if (hp <= 0)
{
HpBar.IsDisplayed=false;//表示をOFFにする
Destroy(gameObject);
}
}
作成物
上記の方法で作ったものが先の動画に出てくる敵で、ダメージに応じHpゲージが短くなっている。また敵が倒されるとゲージは非表示になっている。